Coming together

Coming together
Getting close to paint

Saturday, May 25, 2013

Refinishing the deck lid - one original piece saved!

Fun week this week; I took the G to the drag strip for the first time, and for me the first time in probably ten years.  I managed to run a respectable 13.98, which counts as thirteens to me.  Pretty typical for a stock G I understand, and probably not bad for 20" rims with tires at stock pressure.  There was one LS2 powered GTO (~2005?) running low twelves.  I couldn't tell if it was stock or not, but that would be great if the Chevelle can run anywhere near twelves. Anyway, on to what most of you are hear to read about.

Everyone asks me if there are any original panels that will be left on the car.  Well, the answer is at least one.  The deck lid I believe to be original to the car, and until now still had factory paint on the underside.  I thought it was in perfect shape, but like everything else on the Chevelle, there are surprises waiting at every turn. From a distance it looks fine, but up close there were still a few pinholes of rust from where moisture gathered.  The first picture gives you an idea of the overall underside.

 Up close, you can see pitting from rust,
 and a few small holes along the bottom seam.


 From the outside, it looks fine, so that is one plus.  There are five different moldings that cover over the back panel.
 The sail panel between the roof and trunk looks to be in good shape.  These often rust out, but look okay.  I think all the moisture settled to low points, because that is where we are finding rust.

 And finally, the last three pictures are the deck lid back in primer sealer.  One original part ready to go back on the car.  I don't think anything else will be this easy.  I can see why people build rat rods.


Friday, May 10, 2013

Oh crap, that's going to hurt the pocketbook


 It's been a long while since I've had an update because the Chevelle is off to the body shop.  Thankfully, Chevelle fans, Jack stopped by tonight with a CD full of pictures.  So many pictures that I think I'll break them into three or four installments to fill the next few weeks.

Just to bring you up to speed, we dropped the body and frame back at the body shop about 4 months ago with the floor "done" and asked them to do the body work on the outside, with the instructions to do what it takes.  With Jack, it pretty much has to be this, since there is the right way, or don't bother asking him to work on your car.  You don't ask Rembrandt to paint impressionistic water lilies...

Mt first reaction was oh crap, this is going to cost a lot of money.  I guess that isn't anything new. It's just amazing to see how much rust is in every little crack and crevice.  I'm really not sure that the Chevelle was worth restoring, but it has great history, family value, is halfway there, and will be a really cool ride.  I'll be able to confidently say with care, it will be around to pass on to the next generation.

I suppose the alternative title for this blog could be beauty is skin deep.  I thought the doors were the one piece that was in perfect shape, just sand down and paint.  They didn't even have door dings.  Looks okay from the outside right?


Well, maybe not so much.  I wasn't expecting the door skins to come off, but it looks like it was a very good thing they did.  There appears to be all kinds of rust at the seams.  I guess this is what you get with a barn find car.  The surface looks good, but moisture must have been trapped in every seam and crevice over the years.  Every seam they open looks bad like you can see on the door inner below.  It makes me wonder how great those barn finds they show on TV really are.  I bet unless they are from somewhere dry, they all look like this. Not good.


Here is a close up of the rust at the seam.  You can't see this from the outside until you take the skin off the door, break it open, and expose the rust.  I had no clue.  It's a very good thing the body shop found this, or I'd be complaining about rust popping through in a couple years.  When I looked in between the skins, I saw all of the non-rusty parts.  Everywhere you see rust was in an area where two metal parts come together that made it not obvious.  Just looking at the inside of the outer door skin, without carefully looking at the edge made me think all was well with the doors.


The great part about metal though is you can repair it!  I pulled a few example pictures of the work done on the inner door skins to repair the damage.  A little cleaning to get rid of the rust, repair to the lower corners, and everything is like new.


Finally, new coating to prevent rust...


Weld the skin to the inner, and you have a brand new door!


 and back on the car! Well, very temporarily back on the car.  There is a lot more work to do on the quarters, firewall, and I'm sure lots of other little bits I don't know about.  At least the new door is 100% rust free and should be good for a very long time.  Keep your eye on that dash, I think it is going to be the only 100% original part left when we are done!  Next week I'll share the quarters, or maybe the roof.  I have a week to decide...

Sunday, February 17, 2013

Dash updating

 With the body off to the shop, there's not a lot more to do other than order more parts.  One of the challenges troubling me is how to connect up the new motor to old gauges.  Everything in the original set is manual, whereas the LS motor is all electronic.  I love the original dash look, and don't want to cut it up to put in aftermarket gauge pods.  I found Dakota Digital is now making analog gauges with all of the electronics behind them to hook up modern motors.  This solves that pesky problem of how to convert an electronic speedometer to a non-electronic gauge. There is a solution that runs a little motor behind the dash, but I hear that is noisy, and costs half as much as the whole DD system.

They offer a few different colors and styles, I got mine with the gray face and red backlighting.  I thought the red goes more with the GTO theme, since red is what Pontiac used the last few years.  The new cluster fits perfectly to the original style bezel with just four screws.  If I wanted to be freakishly anal, they send phillips screws instead of 1/4" hex head screws.  Oh well. I left the original in the top picture so you can see the difference in style.  I have to admit I love the styling of the '65 gauges, and am a little disappointed the DD looks so plain beside it.  It would have been just too much trouble to get the originals to work.  Perhaps they are worth something, since I have the more rare SS package with the center tach.  For those taking apart a dash, take a look around for help on how to remove the switches. There is a special tool for all of them; I used a pair of snap ring pliers for the headlight and wiper switches that worked very well.  For the ignition switch, use a small screwdriver, turn the key to accessory, push in the screwdriver in the small hole until it goes in a long way (not just pushing down what feels like a spring) and the lock mechanism pops out.  This is the only way to remove the retainer ring.  They are expensive to replace if you choose, so don't get frustrated like I get and take out the channel locks!


And then there is the electronics to make this all work.  In '65 there were no simple computers - now I have one to run the engine, the two below to run the dash and ignition switch, and there will be a couple more under the seats for the heaters.  More computing power than Apollo, as a friend put it.  I'm more than a little scared about hooking this up, but hopefully one wire at a time and I will get there.  The starter kit is from Advanced Keys, right now I just have the push button.  I still need to get the RFID system added so no one can jump in and start up the car without a key.  Not a big deal, but it is another system to wire in!


The final product is below with everything installed (except the radio).  I used the original switched and am hoping they are all in good working order. You can get replacements for the headlights and lighter, but I couldn't find anything for the wipers.  They all cleaned up very nicely with a little polish and elbow grease.  I still need to either polish the key guard or get a new one.  For the start button, I had to use a rotary tool and grind away almost all of the opening behind the dash (out to ~34mm).  The switch is 40 mm in diameter and barely fits in the opening, if you try this be forwarned you will need to start cutting into the outer bezel ring on the dash just ever so slightly.  I really like how it all turned out.  The push button switch is extra, but I love not having a key for my Infiniti.  I haven't found a radio I like yet, so I'm hoping that in the next year someone comes out with something a little nicer that will fit without cutting.


My biggest challenge, was getting a good bezel.  The first one I ordered from OPGI came with many scratches to the surface.  The packaging was perfect, so it came from the manufacturer that way.  The second also had a few scratches you can see on either edge, but better than the first so I decided to keep it.  The mold lines are not as crisp as the original dash.  If I wasn't dead set on the chrome look, I would paint the original silver and chrome leaf the outer edge.

I'll leave with one last picture we found from 1965. Take a careful look if you miss it - the Chevelle is in this picture!  You can see the motor behind John, and the body with the doors, fenders, hood, and the ROOF missing.  Absolutely incredible to me.  If you count the factory, my restoration will be the third time this car has been built from the ground up with almost all new parts.


Saturday, December 29, 2012

Sending the kid off to college...


Yesterday was a big step forward for the restoration - the crew from the body shop came by and picked up the Chevelle to get started on the final body work.  I've been looking forward to this day, because it means that all of the metal work for me is finished and I will be getting an assembled and painted car when it comes back.  Just to preview, they will be replacing the passenger side rocker (damaged), part of the drivers side rocker (a little rust), stripping the body down to bare metal, fixing/creating the missing filler piece between the taillight panel and trunk, and fixing rust in the quarters.  I'm hoping they save the original quarters, but it will depend on what they look like once they get through the paint.  Of course it will still need plumbing, wiring, interior, weatherstripping, moldings, etc, when it comes home, but it will look more like a car again. It also means big bills coming since someone else will be doing the work.  

I was not expecting was the other emotions that came with sending the Chevelle off; this must be what it's like to send a child off to school.  When will it come back?  Will they do a good job without me around?  How will others feel about the work I did (car guys are the biggest critics in the world!)?  For the past year the Chevelle has been a constant fixture in the garage, and something I could usually go out and work on when I needed to do something with my hands.  I guess it's time to clean up the garage while there is space.  Perhaps finish powdercoating and sandblasting, and sell off the stove and blast cabinet? What do car guys do while their project is off at the body shop?  Enjoy time with the family?

If you have been following my blog, then you know that with some help, I replaced the front half of the floor pan, the trunk pan, and fabricated a tunnel to fit over the T56 transmission.  The frame was painted, a used LS1 fit along with accessories, and all new suspension and brakes installed.  Everything is stripped off so it is pretty much bare for the body shop to start.

Over the next few weeks and months we'll be stopping by the body shop taking pictures of the progress to keep everyone updated.  I have no idea what the timeline will be; I'm hoping for 4-6 months but have no idea if that is too long or too short.


BTW, I've had a lot of people ask about the wheels.  They are loaners from the body shop, made from 1/2" plate steel and weigh about ~100 lbs each.  The wheels do look strange, but have worked quite well.  The large openings and skinny size allow great access to the suspension and were very easy to work around.  Pretty useful, even if they do look more than a little odd!

Saturday, December 22, 2012

Reupholstered rear seats

This week's blog is going to be more pictures than writing, and you get to see a little preview of where I'm headed with the final project.  When we picked up the Chevelle, the interior was pretty destroyed from years of moisture and being closed up.  Everything was covered in white mold or mildew.  We were really hoping to save the seats, since they were in such good condition.  We went over the seats with bleach solution and Febreeze, and tried setting them in the sun, bagged with coffee grounds and drier sheets.  Nothing worked to get rid of the musty smell.  We decided a few months back the interior wasn't salvageable, but were hoping to wait until the car was painted to get anything recovered.  Last week we decided we had enough of the smell in our basement and decided to go ahead and get the rear seats recovered.  I had purchased front seats from a 2008 Ford Taurus because I liked the boxy style, plus they were heated and full power.  Seats from a sedan do not have the lever to flip the back forward to get into the rear seat, but this is a small price to pay for modern seats.  The original '65 seats don't even have a lock to hold the back in place, so they can flip forward at every stop.  I'd rather have fixed backs and headrests.

Rather than recover the backs with factory covers that would be a different style, I decided to try to get custom covers made to match the Taurus seats.  The fronts also have nice silver stitching as an extra detail.  We found a local shop, Mark's Upholstery, and gave them a call. He immediately pointed out the seats are black, but a dark charcoal.  I hadn't noticed this since we didn't have them next to a true black.  I really like the dark charcoal, and I think it will look really sharp with the stock black door cards and carpet.  They were able to find a charcoal that is a perfect match, including the perforated center sections.

Here is what the seat looked like when we started - all covered in mildew:


I was surprised to hear back after just a week that the seats were done and ready to pick up.  I think the mildew smell had them motived, or maybe Mark's is just that good.  They did say they smelled the mildew every time they walked by the rear seat in the shop.  The replaced all of the burlap and cotton padding, so the smell is completely gone.  This was the last bit of soft material left, so everything inside will be new or refurbished.  No worries about mildew any longer. Here is the final product back from upholstery, next to the front seat for comparison.  The center vinyl is perforated just like the fronts, with silver stitching around the edges.  The sizes of the panels matches perfectly, like both seats were meant to go together. 


I took a few pictures of the rear seat sitting in the car.  It's amazing how much it transforms the car just having interior sitting in it, you really get the feel of what it will look like.  It's a different style that looks more modern to me without being out of place.  I've seen lots of examples of new seats people fit in from GTO's that I'm sure are very comfortable, but the wrap around buckets just look out of place.  I'm sure it's partly because it's my car, but I think this looks updated without looking out of place with the boxy style of the '65.  I took a few pictures without the headrest so you can get a little comparison how it would look like compared to the factory look.  They may be Ford fronts, but Chevy would have built it like this if they had more technology back in the day.


Monday, December 10, 2012

Digging through old slides

I hurt my back Friday trying to bottle my Jubilale clone, so no working on the Chevelle this week.  Since I'm finally on good drugs for the pain, what better to do than to try to write a blog.  The doctor says it's a bit like truth serum, so I will take no responsibility for the content or coherency of the writing below.  I'll blame Jill since I will ask her to edit this later.

I love looking through old pictures and thinking about how lives intertwine.  I have a lot of old pictures from my family when my sisters were kids back in the late sixties.  My parents had just purchased some farmland outside of Marion and made the statement '100 trees cost the same as five, so why wouldn't we buy 100?'. Or something like that. Anyways, Jill's Mom has been sick the last month (Best wishes and get better soon Min!), so she has been traveling back home to help out.  She brought back some slides and pictures from the late sixties of the Chevelle and one of her Dad's other projects, a Dodge Dart Swinger.  I'm hoping that she can find more pictures later, but here is a preview of what we found.  I find if very cool to see pictures of the Chevelle back when it was nearly new (but wrecked).  Think about the skill it took for Hoss to repair these cars with hand tools and a torch.

This is the only picture I have found so far of the roof repair in progress.  It looks like the new door is on and he is fitting the roof (from a 1965 GTO) in these pictures.


Hoss completely finished the car in 1965, and then someone hit the front fender in 1966, so he had to repair and repaint again.  That must have been maddening after all the work the previous year.  I must say with the manual brakes and manual steering back in those days, it is incredible that any cars survived to today.

 As evidence they drove the Chevelle everywhere - here are a couple pictures along the road and at the Gulf Coast in Louisiana.  This is how it looked after the rebuild.  They dropped the 327 badges off the fender, removed the hood spear, and ran the factory whitewalls with no hubcaps.  It was a sleeper unless you knew what the Malibu SS on the fender meant.  No 283 here, and I think they drove it like a 327 should be driven.  The center bar on the grill was painted black and the center emblem removed.  It was cracked in the first accident, so they never installed it.  I still have this emblem and grill hung in my basement above the bar (Bar and Grille... yes, it's okay to moan).  It's a neat look, although I'm going to leave the center bar stainless as the factory had done originally.


I love this picture of Hoss on his bunk in Viet Nam.  If you look carefully at the pictures you see Min and pictures of the Chevelle above his bunk, including some of those above.  Maybe even the same prints we found that he brought back!  How cool is that?  Hoss served in Viet Nam fighting and repairing vehicles after combat.  That must have been an unending job.

 In the picture below the Chevelle looks like it was just repainted. The date on the picture is 1972, well after the first restoration and before the 1974 lifter problem that led to it's current state.  The garage went in the year before, so the date on the picture must be correct.  I think all of the trim parts I have probably were intended to go back on the car after this repaint.  I don't know the story about why it was being redone in 1972, but it sure does look good.

 In the slides we also came across lots of pictures of the Dodge Dart Swinger that Hoss rebuilt.  It looks like an easy roll with damage to the doors, fenders, quarters, and roof. Ha, easy roll is a misnomer!  I have to admit I don't think I have seen this year of a Dart ('67 or '68?); it is a really good looking car.  I've never really thought that about the Dart, but I would own one like this.  It has the 340, and was a strong runner.  The first two pictures are the before, and two more pictures of the completed car.  I wonder what happened to the Swinger?  Someday it might be fun to see if we can track it down to figure out what happened to it.  Jill doesn't have a lot of memories of the Swinger, so it must have been sold in the early seventies.


And finally a great picture of Jill and her Dad.  She was such a Daddy's girl - after she was born you don't find many pictures of her or Hoss alone.  She was always out helping in the garage; here holding the hose when pressure washing one of the Vega's.  The Chevelle sits lonely in the background.  Hope you enjoy the trip down memory lane as much as I did.  Back to drugs and trying to heal my back so I can get back to my turn at rebuilding the Chevelle.

Sunday, November 4, 2012

Second try at headers

I have determined today that there will be no free lunch for me when it comes to engine swaps.  A few months back I blogged about installation of Doug's Headers that were supposed to be designed to fit an LS1 swap into a '65 Chevelle. For those that don't recall, after a lot of massaging to the pipes I did get them to fit, but they were still very close to the frame rails, the passenger side hit the floorpan, the spark plug wires hit the pipes, and I wasn't sure steering linkage would fit.  The headers were of great quality, I just don't think they were well designed for a '65 swap.  And they were pricey, at least for my budget.

Fortunately/unfortunately I found the Hooker Headers came out with a cast manifold this year designed for LS1 swaps.  It isn't specific for any application, but they claim a tight to the block design to maximize space.  They were cheap relative to Doug's, and come ceramic coated, seemed like a great solution to the problems above. After waiting for a month of backorders, they finally arrived this week. They look like a nice piece, although I was disappointed they didn't come with gaskets.  Not a big deal at $12 from the parts store, but you would think they would include gaskets so you didn't have to run out in the middle of the project.

The first set of headers came out easy enough, thankful since the body is on now and I wasn't sure what space was there.  The new gaskets that came with Doug's Headers split in half, so I had to run out to Autozone to pick up a new set.  Only trouble was scraping off the gasket material.

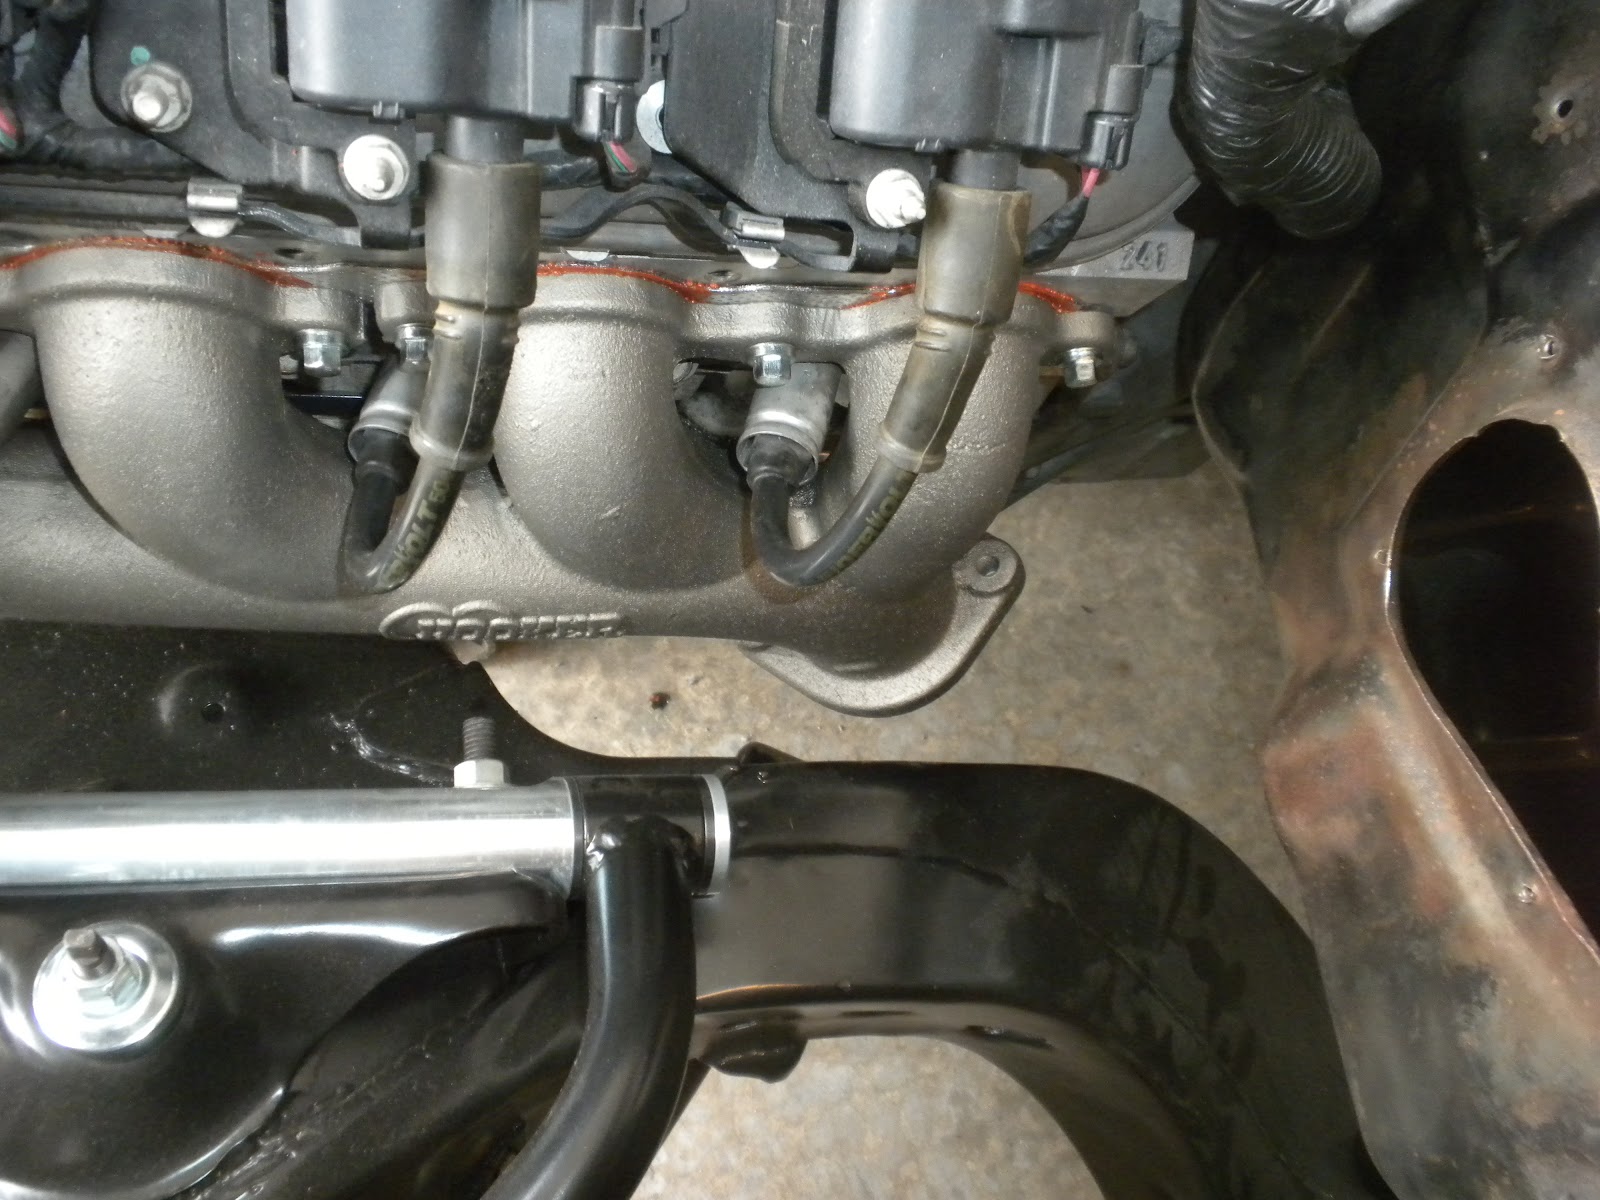
Lucky for me, the Hooker headers seem to be a great alternative for this swap.  Both sides fit right up with no modifications needed.  I have a couple watchouts for the passenger side; 1) the manifold flange to the catalytic convertor touches the starter soleniod and might over heat it, and 2) the angle is a little steeper down than I would like, more directed towards the firewall rather than the ground would have been better.  Overall I think that we should be able to fit the catalytic convertors in place with a sharp bend on the passenger side.  For the starter I may look to see if any of the F-body starters have the solenoid clocked more towards the block if there is a hot start issue.

Here you can see the clearance to the passenger side frame rail.  A little tight, but better than 1/8" space to the flange, which could be trimmed if absolutely necessary.  I went with the titanium finish since I wasn't sure how chrome would look over cast iron.  I like the subtle look that could fool you into thinking they were stock if you didn't know better.  Hooker claims to have good power out of these, I'm sure not as much as long tube headers, but they fit and will be nice and quiet since they are cast and not tubing.


 The fit on the drivers side is great, with loads of room around everything.  I probably have a good 1" space to anything around the header.  Plus the spark plug wires are no where near hitting the manifold now, so they won't melt.  Very good thing.  And room for catalytic convertors here, so I can pretend I'm being green.
 It's hard to see in this picture, but I wanted to show how the power steering lines up now. The long tube headers looked like they were very close to blocking the path, now you see a clear line of sight from the box back to the opening in the firewall.