Coming together

Coming together
Getting close to paint

Monday, December 10, 2012

Digging through old slides

I hurt my back Friday trying to bottle my Jubilale clone, so no working on the Chevelle this week.  Since I'm finally on good drugs for the pain, what better to do than to try to write a blog.  The doctor says it's a bit like truth serum, so I will take no responsibility for the content or coherency of the writing below.  I'll blame Jill since I will ask her to edit this later.

I love looking through old pictures and thinking about how lives intertwine.  I have a lot of old pictures from my family when my sisters were kids back in the late sixties.  My parents had just purchased some farmland outside of Marion and made the statement '100 trees cost the same as five, so why wouldn't we buy 100?'. Or something like that. Anyways, Jill's Mom has been sick the last month (Best wishes and get better soon Min!), so she has been traveling back home to help out.  She brought back some slides and pictures from the late sixties of the Chevelle and one of her Dad's other projects, a Dodge Dart Swinger.  I'm hoping that she can find more pictures later, but here is a preview of what we found.  I find if very cool to see pictures of the Chevelle back when it was nearly new (but wrecked).  Think about the skill it took for Hoss to repair these cars with hand tools and a torch.

This is the only picture I have found so far of the roof repair in progress.  It looks like the new door is on and he is fitting the roof (from a 1965 GTO) in these pictures.


Hoss completely finished the car in 1965, and then someone hit the front fender in 1966, so he had to repair and repaint again.  That must have been maddening after all the work the previous year.  I must say with the manual brakes and manual steering back in those days, it is incredible that any cars survived to today.

 As evidence they drove the Chevelle everywhere - here are a couple pictures along the road and at the Gulf Coast in Louisiana.  This is how it looked after the rebuild.  They dropped the 327 badges off the fender, removed the hood spear, and ran the factory whitewalls with no hubcaps.  It was a sleeper unless you knew what the Malibu SS on the fender meant.  No 283 here, and I think they drove it like a 327 should be driven.  The center bar on the grill was painted black and the center emblem removed.  It was cracked in the first accident, so they never installed it.  I still have this emblem and grill hung in my basement above the bar (Bar and Grille... yes, it's okay to moan).  It's a neat look, although I'm going to leave the center bar stainless as the factory had done originally.


I love this picture of Hoss on his bunk in Viet Nam.  If you look carefully at the pictures you see Min and pictures of the Chevelle above his bunk, including some of those above.  Maybe even the same prints we found that he brought back!  How cool is that?  Hoss served in Viet Nam fighting and repairing vehicles after combat.  That must have been an unending job.

 In the picture below the Chevelle looks like it was just repainted. The date on the picture is 1972, well after the first restoration and before the 1974 lifter problem that led to it's current state.  The garage went in the year before, so the date on the picture must be correct.  I think all of the trim parts I have probably were intended to go back on the car after this repaint.  I don't know the story about why it was being redone in 1972, but it sure does look good.

 In the slides we also came across lots of pictures of the Dodge Dart Swinger that Hoss rebuilt.  It looks like an easy roll with damage to the doors, fenders, quarters, and roof. Ha, easy roll is a misnomer!  I have to admit I don't think I have seen this year of a Dart ('67 or '68?); it is a really good looking car.  I've never really thought that about the Dart, but I would own one like this.  It has the 340, and was a strong runner.  The first two pictures are the before, and two more pictures of the completed car.  I wonder what happened to the Swinger?  Someday it might be fun to see if we can track it down to figure out what happened to it.  Jill doesn't have a lot of memories of the Swinger, so it must have been sold in the early seventies.


And finally a great picture of Jill and her Dad.  She was such a Daddy's girl - after she was born you don't find many pictures of her or Hoss alone.  She was always out helping in the garage; here holding the hose when pressure washing one of the Vega's.  The Chevelle sits lonely in the background.  Hope you enjoy the trip down memory lane as much as I did.  Back to drugs and trying to heal my back so I can get back to my turn at rebuilding the Chevelle.

Sunday, November 4, 2012

Second try at headers

I have determined today that there will be no free lunch for me when it comes to engine swaps.  A few months back I blogged about installation of Doug's Headers that were supposed to be designed to fit an LS1 swap into a '65 Chevelle. For those that don't recall, after a lot of massaging to the pipes I did get them to fit, but they were still very close to the frame rails, the passenger side hit the floorpan, the spark plug wires hit the pipes, and I wasn't sure steering linkage would fit.  The headers were of great quality, I just don't think they were well designed for a '65 swap.  And they were pricey, at least for my budget.

Fortunately/unfortunately I found the Hooker Headers came out with a cast manifold this year designed for LS1 swaps.  It isn't specific for any application, but they claim a tight to the block design to maximize space.  They were cheap relative to Doug's, and come ceramic coated, seemed like a great solution to the problems above. After waiting for a month of backorders, they finally arrived this week. They look like a nice piece, although I was disappointed they didn't come with gaskets.  Not a big deal at $12 from the parts store, but you would think they would include gaskets so you didn't have to run out in the middle of the project.

The first set of headers came out easy enough, thankful since the body is on now and I wasn't sure what space was there.  The new gaskets that came with Doug's Headers split in half, so I had to run out to Autozone to pick up a new set.  Only trouble was scraping off the gasket material.

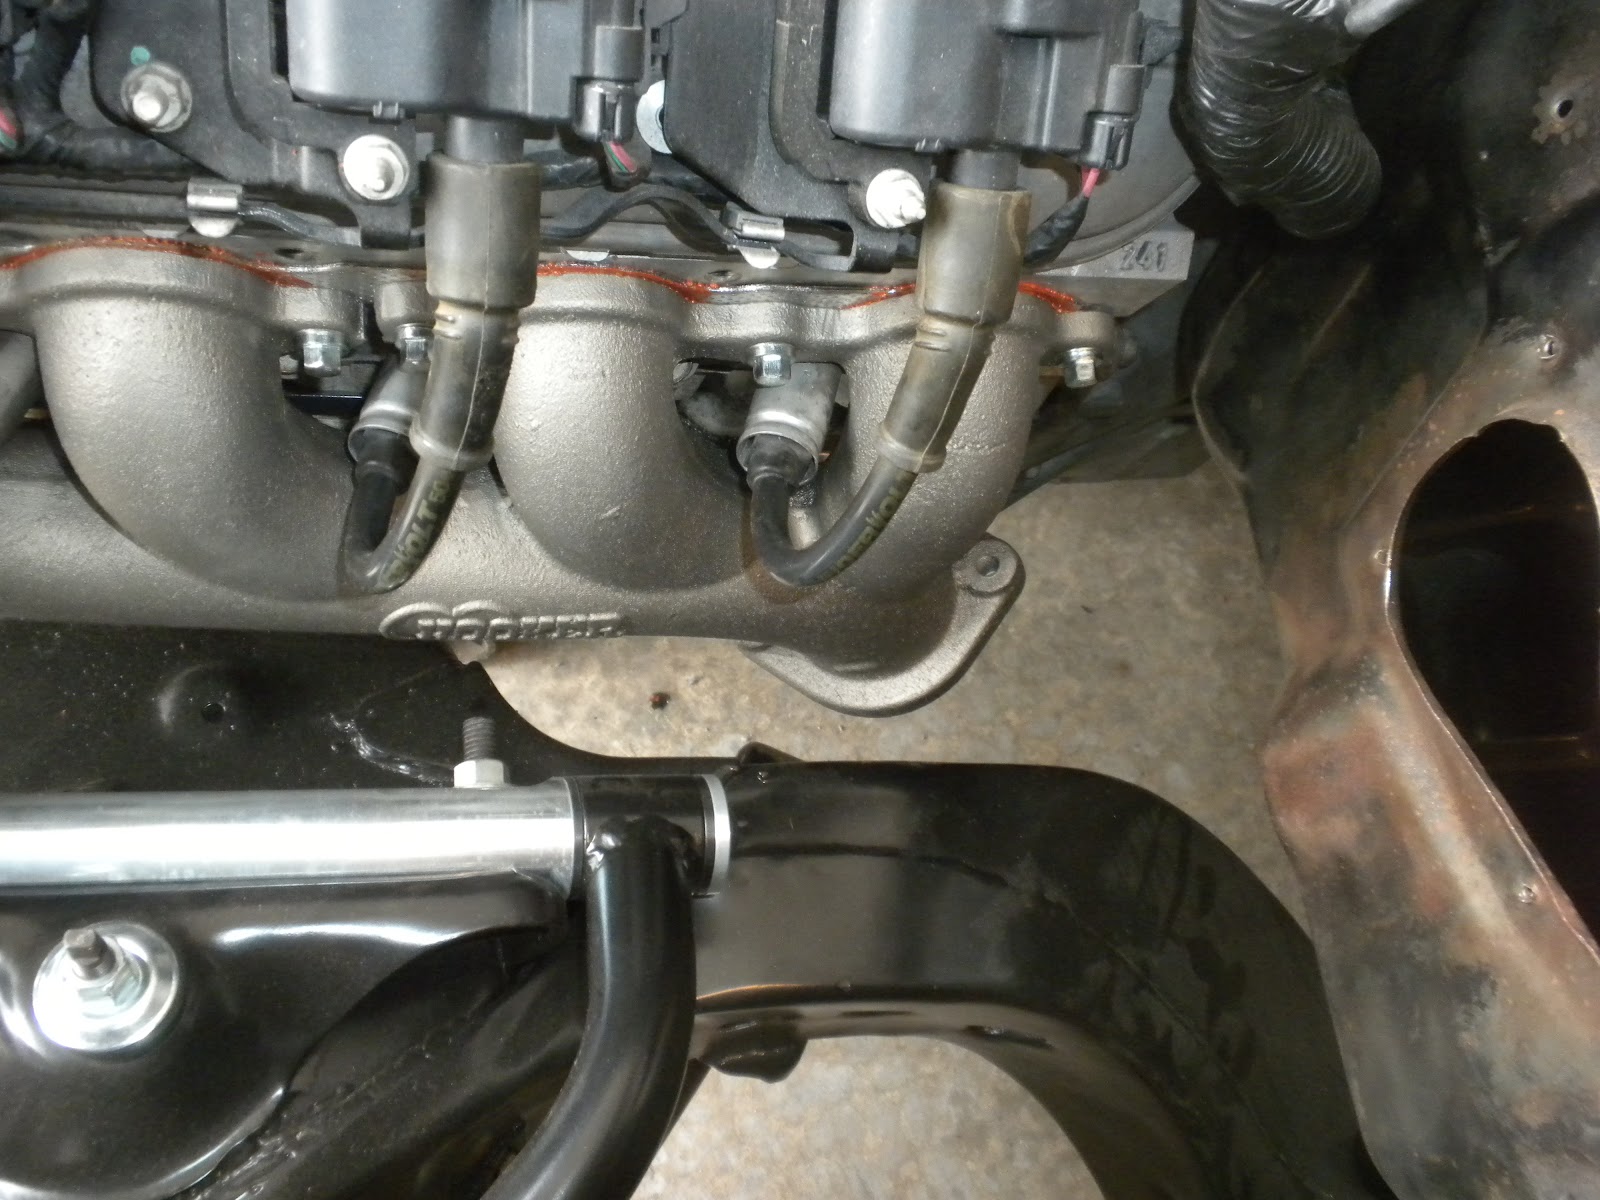
Lucky for me, the Hooker headers seem to be a great alternative for this swap.  Both sides fit right up with no modifications needed.  I have a couple watchouts for the passenger side; 1) the manifold flange to the catalytic convertor touches the starter soleniod and might over heat it, and 2) the angle is a little steeper down than I would like, more directed towards the firewall rather than the ground would have been better.  Overall I think that we should be able to fit the catalytic convertors in place with a sharp bend on the passenger side.  For the starter I may look to see if any of the F-body starters have the solenoid clocked more towards the block if there is a hot start issue.

Here you can see the clearance to the passenger side frame rail.  A little tight, but better than 1/8" space to the flange, which could be trimmed if absolutely necessary.  I went with the titanium finish since I wasn't sure how chrome would look over cast iron.  I like the subtle look that could fool you into thinking they were stock if you didn't know better.  Hooker claims to have good power out of these, I'm sure not as much as long tube headers, but they fit and will be nice and quiet since they are cast and not tubing.


 The fit on the drivers side is great, with loads of room around everything.  I probably have a good 1" space to anything around the header.  Plus the spark plug wires are no where near hitting the manifold now, so they won't melt.  Very good thing.  And room for catalytic convertors here, so I can pretend I'm being green.
 It's hard to see in this picture, but I wanted to show how the power steering lines up now. The long tube headers looked like they were very close to blocking the path, now you see a clear line of sight from the box back to the opening in the firewall.

Sunday, October 28, 2012

Center console mounting

I mentioned in my last blog the original center console didn't fit with the Tremec T56 shifter position, which is about 8" back and centered vs. the offset Muncie.  To try to keep with my goal of a stock look, I really wanted to use the center console.  Plus, it just looks cool.  I found a shifter on eBay the moved the mounting location 2" left of center, with no offset front or rear.  If I hadn't already built the floor section I might have gone with one that had a forward offset to get the console a little closer to stock, but the position it is at feels just right.  That, and I don't know how much the offset will affect the shifter feel.

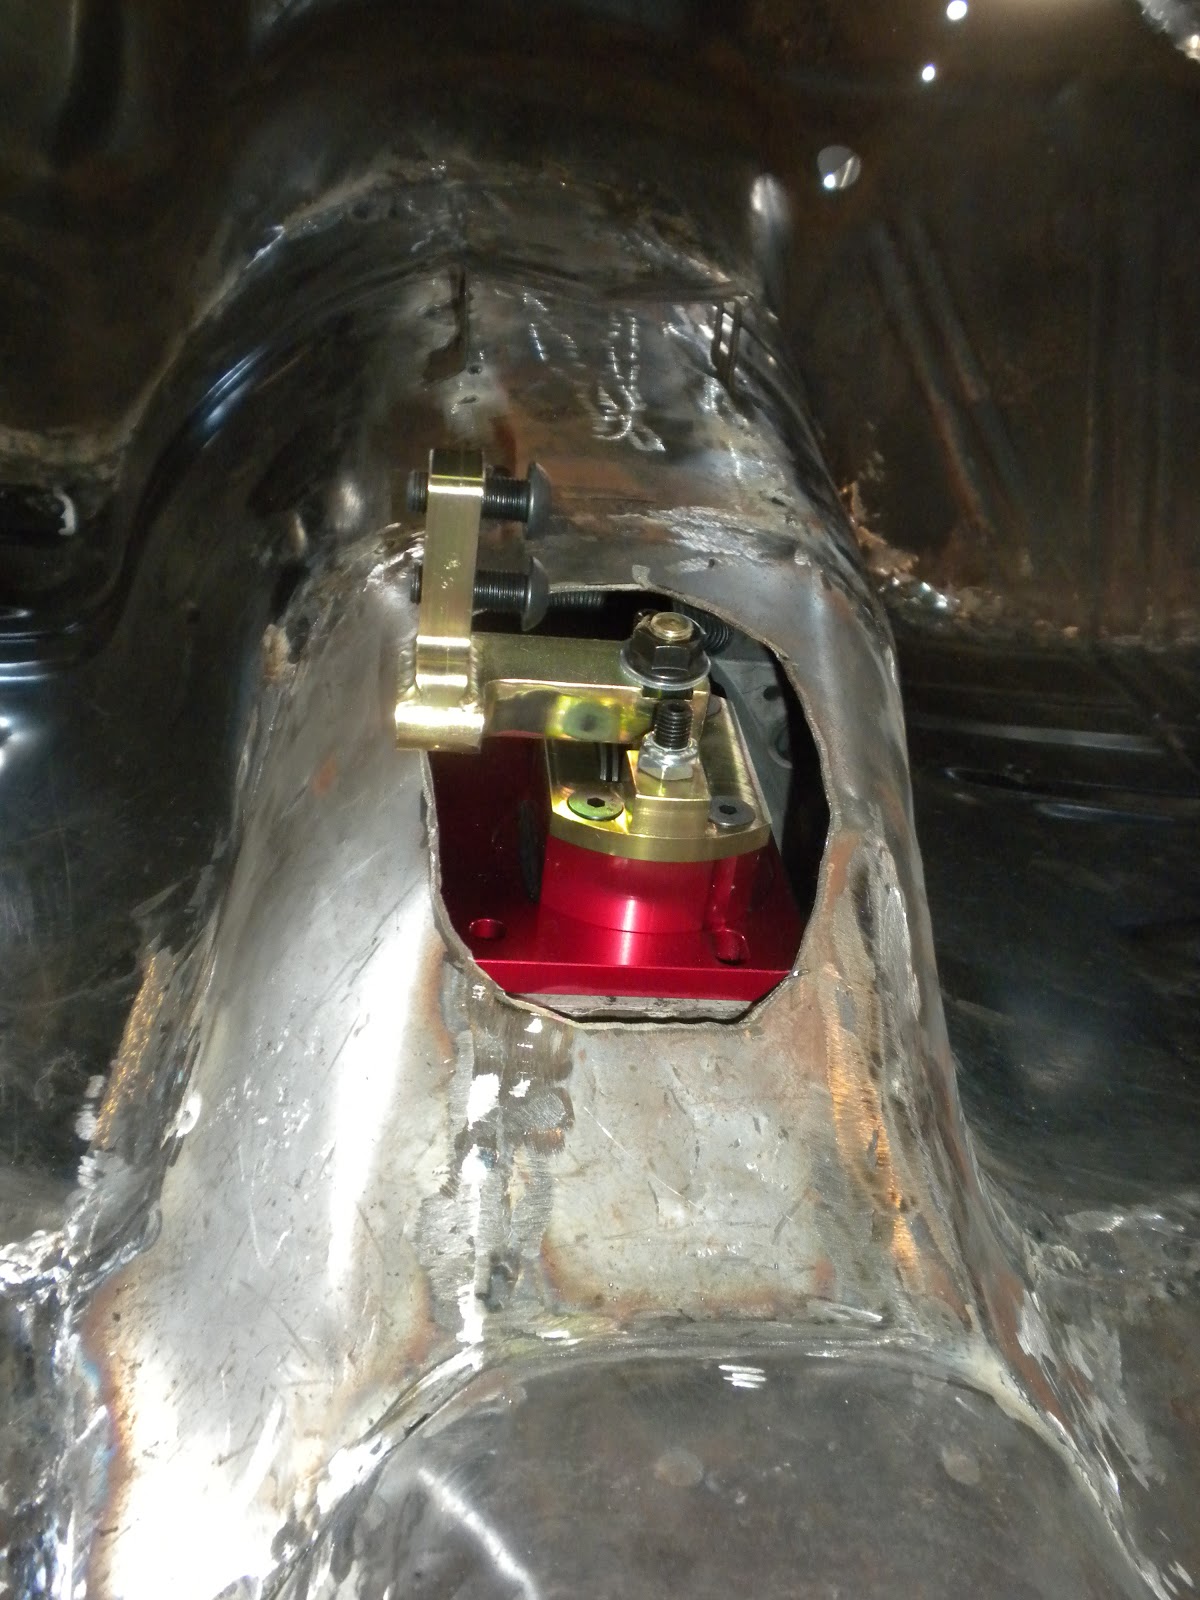
The first two pictures you can see the offset shifter position.  To my surprise the part that is giving me the biggest problem is the black center nut on the new shifter.  It sticks up high enough to hit the console in the position I would like it to sit (see gap in bottom pictures).  I wish they had used a more space saving design on this part.  I might use a flatter nut and trim the bolt off, but I think it will work for now.


 Here you can see how the center console now sits nicely down the center line of the car without being pushed out of position by the shifter. There are a few bumps on the floor here and there, but I think it fits pretty good, considering it was designed for a tight fit in a completely different place.
 To get the mounting right, I moved all of the brackets back.  To give an idea of how far, notice the gray area in the middle of the picture, and the bracket that was there moved towards the left side.  They are only tacked on along the edge of the bracket from the factory, so getting them out was as simple as grinding a little off the outside edge.  No spot welds here.  The front and rear brackets fit fine with a little persuasion, but the middle bracket sits in a low spot on the tunnel, so I added tabs on either side to lift it up about 1/2" off the floor.
 And, the final product.  Stock console, moved back in the car using original brackets.

 In the last picture you can see where the shifter sits relative to the drivers seat, with it in about mid position.  The only bad part I can see is the 1" gap around the front section.  Because the console is angled up in front, sliding it back creates a gap to the floor.  I'm hoping there is some extra slack in the molded carpet, or maybe I can split it down the middle to push the carpet out flush with the console.  I'm thinking a little padding on top of the floor will help hold the carpet up against the console, and a little extra sound deadener above the transmission should be good.
I've got a long road to go, but it felt good to sit in the car and have a solid floor, upgraded interior that fits, and all of the suspension work done.  Well, except brakes.  Little details...

Sunday, September 16, 2012

Taurus seats in a '65 Chevelle


A few weeks back I gave a preview of the 2008 Ford Taurus seats I purchased to go in the Chevelle.  Why new seats?  Well, they are heated, power, leather, have headrests and don't flop forward.  Safety.  And I must say they are very comfortable.  We found ourselves sitting in the seat in the living room watching television instead of sitting on the couch.  The scary part for me is the wiring - there are computers for the airbag/active restraint system, seatbelts, seat memory, heater, and all power adjustments.  I did get a wiring diagram for the passenger seat, but still need one for the drivers seat before I can put it in when the body is ready.  First pictures give you and idea of what I have to deal with. Overall not a lot of modifications needed to make the seats work, but by no means a direct bolt in.  The seat position sensor (middle right) has to go; there isn't room for this the way I chose to mount the seats.
 The Taurus seat has a large foot at the front that had to go. The floor is fairly flat where the seat mounds, so I don't need this height.

The solution - cut off the foot.  Below is the passenger side, for the drivers side I cut it more at an angle with the front taller than the back.  This seemed to fit the contour of the floor a little better, but may have dropped the seat a little too low.


To get the proper mounting to the floor, I welded a nut to a piece of steel (leftover from the trunk pan where it mounted to the frame) and bolted that to the floor.  This way I know that the bolt is lined up.  Next the seat was placed on top, and the rear bolted in place.  Factory holes lined up for both of the rear seat bolts, they just needed drilled so I could change them from a stud to a bolt through the floor.  Confusing, but if you are doing a swap, it will make sense.  With the seat in place I put a few tack welds on the plate, and took the seat back out.


With the seat on the bench, and the plate tacked on, I could finish weld knowing the mounting plate was in the correct spot. Below you can see what the finished plate looks like welded in place with the mounting nut.  I used nuts in front, because with the foot design I used there is no way to get a wrench in place.  I have no worries about the strength of this part.


The plastic trim was now too long to fit with the seat sitting flat to the floor.  Both sides needed the portion that sticks down cut off.  A little Dremel time and you really won't know.  It should sit right on top of the carpet when finished.  
There was also a mounting stud at the back of each track that needed to be removed, to allow the seat to sit flush.  Here it is cut off, just forward of the rear two bolt holes.  I suppose one could have drilled holes in the floor for the mounting studs to sit to help align the seats, but then there would be more holes in the floor.  Easier in my opinion to cut them off rather than put more holes in the floor. 

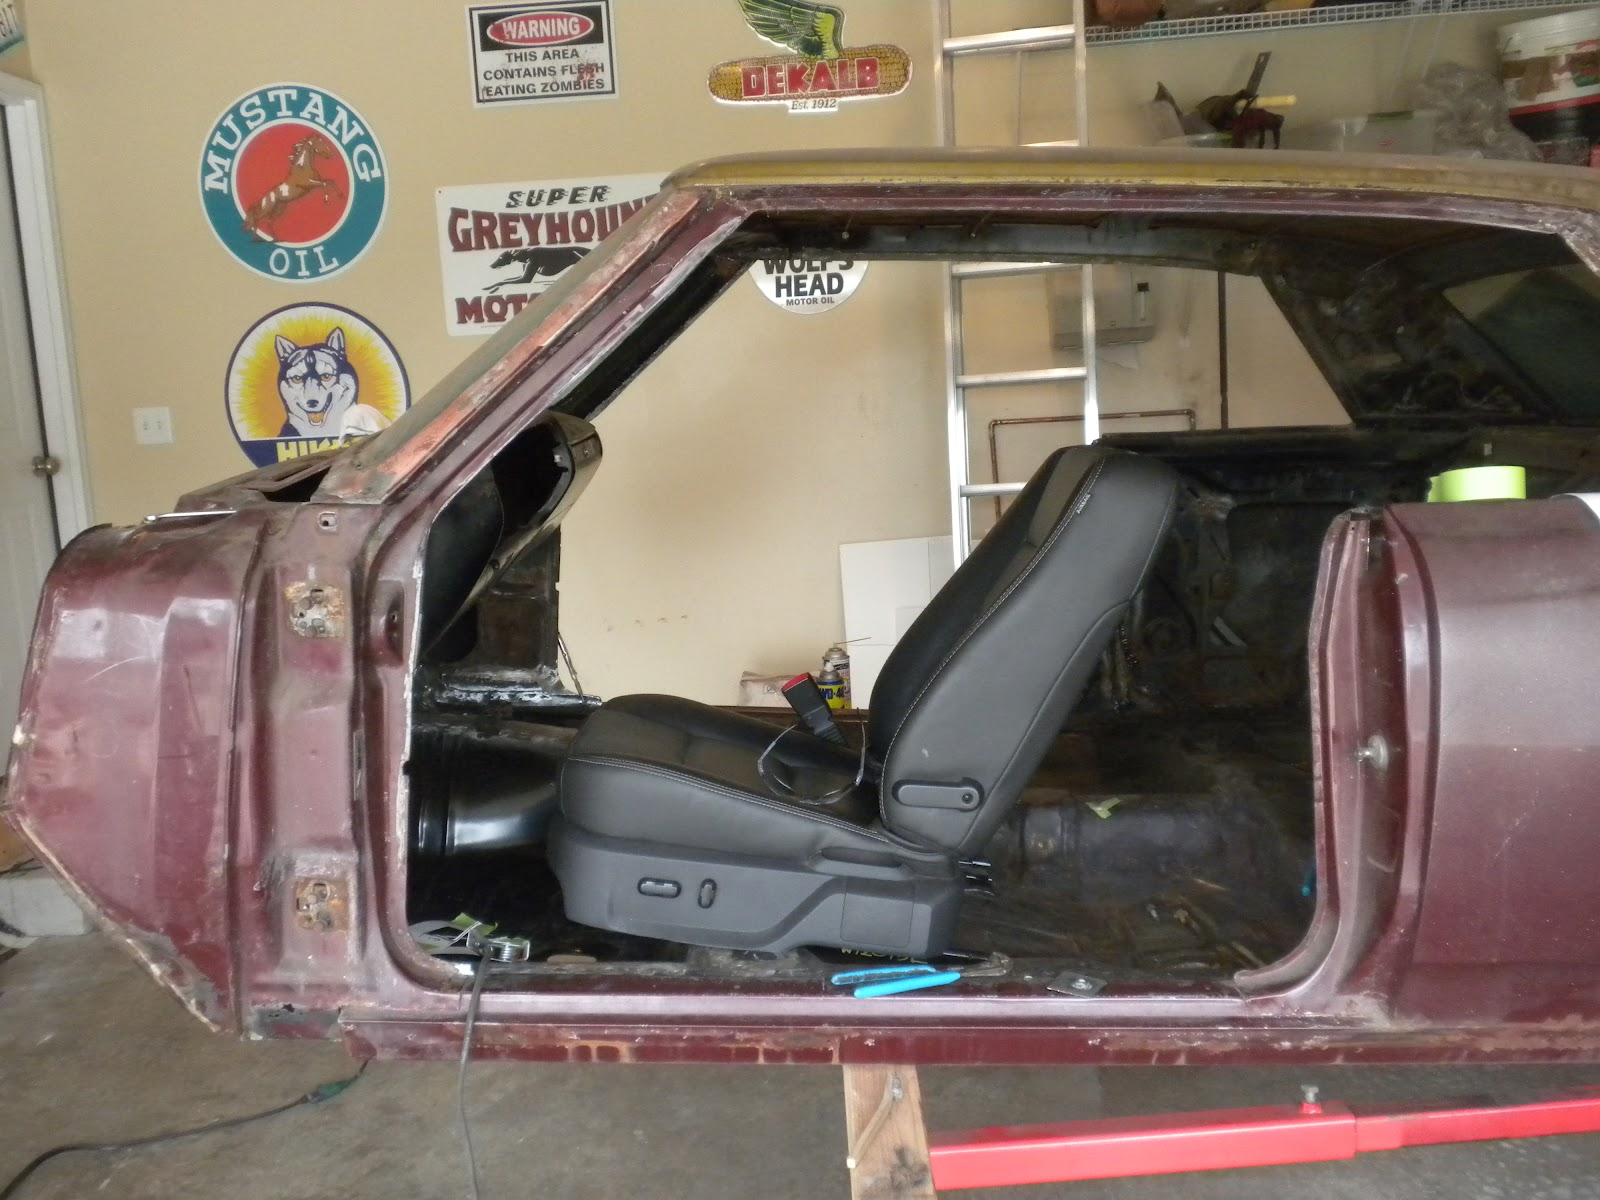
And, the final product.  First picture has the seat all the way forward, easier to get the rear bolts in.  Second picture has is part way back, about perfect for where I would sit.  It was good to fit it in both positions, to get an idea of where to cut the plastic trim since the seat drops down as it goes back.  The seat does have a height adjustment so I could lift it up if it sits too low, but I think it will be good.  Eyeline is just above middle of the windshield, and probably enough room for a helmet between the top of my head and the headliner. The headrests are off now to make it easier to fit, but will be on when I drive it.  I think the boxiness of the Taurus seats fits well with the style of the '65. The steering wheel is centered perfectly, and the shifter falls in a nice spot beside the seat.


Token picture of the passenger side.  A very close look will notice the plastic trim isn't cut yet in this picture, and is holding the front of the seat up.

Next project is to get the body back on the frame, bolt it down, and fit the center console.  For kicks we sat it into place over the new shifter hole.  It sits nicely about 8" back from the original position.  Only problem is the shifter boot is offset to the left, notice that you can only see about half the opening below the console.  I either need to get an offset shifter and move the hole, or try to mount the console farther right.  There is room, but I refuse to cut up the console since they don't make reproductions of this part.  The easy option would be to get a late model console with the shifter in the center.  This might also give me cupholders and center storage bins, but easy doesn't seem to be my way of doing things.  Maybe I need to get over this, but the stock console looks so good in there.

Sunday, September 9, 2012

Finished floor

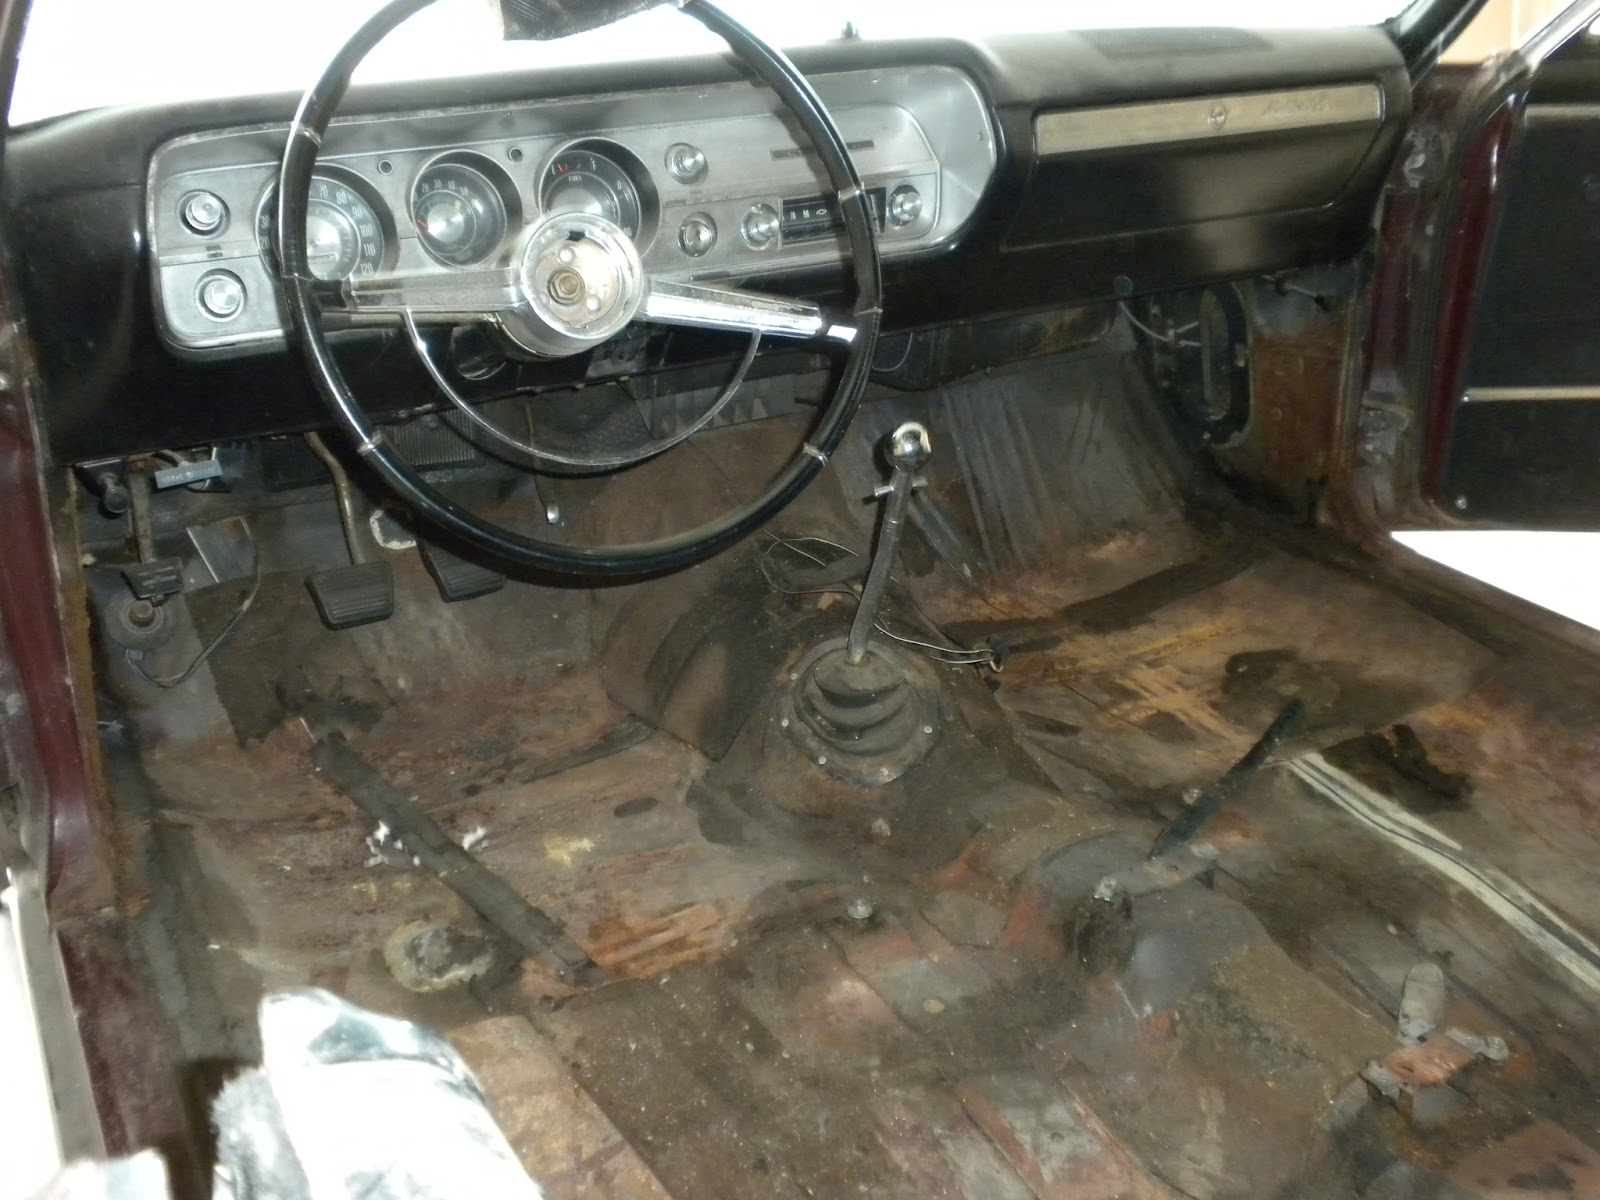
It's been a warm summer this year, way to hot to spend out in the garage with no a/c (or even a/c with no ventilation!).  Now that the weather is cooling down, I had a chance to get back to finishing the floor.  To remind you, this is what I started with.  What you can't see well are the holes in the floor.  It also needed the transmission tunnel widened to fit the T56.

This winter we replaced the floor pans, and I have been waiting to finish off above the transmission until I could match the tunnel to the motor in the frame.  I ended up adding about 4" between the floor pans to get the extra space for the new transmission.  The tape marks where the shifter came through for the T56 - hard to tell but trust me, it is about 8" further back than the Muncie 4-speed, and centered vs. offset to the drivers side.  My first plan was to remove the original panel that surrounded the Muncie, and adapt that to the new hole in the floor.  After talking through options with my brother-in-law Jay, we decided that it might be best to cut out the entire area and build one new piece to fit the shifter, rather than trying to make old parts fit. The shifter solenoid also sticks out more on the left side, so a new part allows me to get the extra space.
Using a piece of paper, I mocked up a template to copy into steel.  
It looks ugly, but this is what it took to make the final filler piece.
And finally, after hours of hammering and tweaking into place, it is welded in place.

I used the Muncie plate to mark the shifter opening, so I can use the stock shifter boot around the opening.  I will need to move the console over to fit the center shifter, but there should be plenty of room with the seats I have chosen. I think the final product turned out okay.  Once everything is painted, the seams sealed, and sound deadener and carpet over the top, it should look nice and smooth.


 For comparison, here is a picture from a similar angle to the before, so you can see the repairs.  Next up will be fitting the drivers seat and center console, then off to the body shop for work on the shiny side.


Saturday, July 7, 2012

Seat selection and car shows

As I have been getting closer to finishing the floor, I decided it was time to make a decision on seats.  I will need to weld in appropriate attachment points, so it's best to do that now before paint and body work.  I do have a good drivers seat, although it was moldy and smelled of 37 years of sitting enclosed in a car outside.  The originals also have no headrest, have a low back, and no lock to keep them from flipping forward.  Not exactly built for safety.  The back seat is in perfect shape, so I am hoping that with Febreeze and some air it will be useable.  That leaves me needing to find front seats that are modern, but somewhat match the original seats. Quite a challenge.  


Several classic GTO's have gone with the modern GTO seats.  They fit well, are comfortable, and have good side bolstering. I was thinking this would be a nice combo to have with the GTO engine as well, although the GTO logo on the seat back was a little offputting.  Replacement seat covers can run upwards of $2000, so recovering really isn't and option on my budget.  We were fortunate to see an El Camino at the Super Chevy Show where they had used the LS2 and entire interior from a GTO.  This must have been a ton of work to get the dash and everything else fit into the El Camino.  More on this El Camino below. While I love the seats, the style is just completely off.  In person they remind me of an overstuffed couch.  I just don't think this works well unless you use the complete modern interior.  Unfortunately, these had to come off the list of options.
My next find were Nissan 350z roadster seats.  A rare few came with buckets with a four panel back, maybe a little closer to the originals.  There is a lot more styling to the seat, but I thought it would be a good fit.  I lost an auction on eBay, and couldn't find another set like this anywhere. Back to the search.

Here is a picture of original 1965 Chevelle interior, maybe easier to see what I'm looking for here.
I came across a set of 2008 Ford Taurus seats, with power, heat, lumbar and airbags.  Obviously airbags won't be usable, but the heat will be nice.  They have the four panel back reminiscent of the Chevelle interior, with a nice boxy shape.  I think these will be a great match to the original interior while adding leather, power, and headrests.  It will be interesting to see if people notice they are not stock; I know Chevelle people will pick up instantly, but I hope they are close enough it isn't obvious they are not originals.  There is more bolstering than the originals (which have none), and they are very comfortable.  The picture really doesn't do them justice. One problem with sedan seats is they do not have a flip lever like seats from a coupe, so to get in back I will have to use the power functions.  How often do you use the back seat in a coupe anyway? I'm quite happy so far, I just need to see how they fit.  The scary part is underneath - I counted 21 wire connections on the passenger seat and 39 on the driver's.  There are two computer modules on each seat to control the electronics.  I was thinking that a seat should just need power and maybe a ground.  There are more electronics in one of these seats than the entire Chevelle had in 1965.  Crazy when all a seat is is a place to put your butt. When it cools off I will see how these fit in the car.  Looks like there will need to be bracket adjustments at the front to make them fit the flat floor; the rear just needs studs welded in at the right place.

A couple weeks ago the Super Chevy show came to Gateway Motorsports park.  I thought it would be a great place to talk with Chevelle owners and get ideas for mine.  At least we came away with the latter.  It was a hot day with lots of great classic drag racing, although they were only running the eighth   mile. I guess just so they could run through cars quicker. We found this beautiful early fifties Chevy truck at the show.  I love the color and the subtle modifications the owner did.  I tried asking the owner about the color, and his response 'black cherry'.  And who makes it? 'Dupont'.  I don't get it - why bring your car to a show and be rude when people show interest in it?  If you don't want to show off and get questions, then stay home.  Isn't the purpose of a car show to show off and brag about how awesome your ride is?  Three words were all I could get out of this guy.
 There were only 2 or 3 1965 Chevelles at the show, interestingly none managed to get the grill painted right for an SS. This is getting to be my new pet peeve on 65's.  Come on, it's not that hard - three skinny bars above and below the center bar should be black.  That's it.  No more, no less.
 This was a nice two door post car - it had the 138 VIN for an SS, but I did not think that Chevy made SS post cars (see the B-pillar int he second picture). Mix of SS and non-SS trim.  Color looks like original Madiera maroon, but it had some metallic, so not factory.  I wanted to find out more about this car, but the owners weren't interested in chatting.  Again, I don't get it.  If you don't want to show off your car, why are you at a car show???

 This was one of the nicest 1965 SS cars there.  Love the license plate 'Drive more hybrids, I need fuel'.


I only saw three LSx swaps at the show, one in the El Camino, and two in first generation Camaro's.  All looked like nice clean swaps.  The Camaro below looked like a great daily driver with probably an older swap.  A couple guys were walking by as we were looking complaining about it - why would you put an LSx in a Camaro?  They didn't like how the motor wasn't polished - the exact comment was 'They must have just pulled it out of a wreck and dropped it in the car'. I thought it looked like the owner was driving and enjoying the car.  More power to them.  This was the first negative comments I have heard from anyone about this swap.  I'm guessing they have never driven an original V8 and compared that to the LSx. I have nothing against Chevy small blocks, but for drivability, you can't beat modern engines, and why would you not want to drive your muscle car everywhere?